 10uh. That's why we like to have a known good inductor we can first test
and then copy.
10uh. That's why we like to have a known good inductor we can first test
and then copy. so you want to wind your own RF Choke?
You will find that most inductance meters are far from
accurate in their ability to accurately read wire wound inductors larger than
10uh. That's why we like to have a known good inductor we can first test
and then copy.
You can check your good wire wound inductor with your el-cheapo inductance meter. This way, you will have an accurate base reading regardless of what the documentation or schematic says. An example is looking at the Heathkit SB220 we see that the large wire wound RF Choke part #31 45-61 is supposed to be 50uh, our testing on 2 known perfectly good ones shows a reading on our meter to be a fluctuation of 34-35uh.... no where near the 50uh stated by Heathkit. But I will assume the Heathkit engineers had a far more expensive inductor tester than we use. Regardless of the Heathkits engineers readings, we know that the el-cheapo tested 34-35uh and that's what we will use to build another, and I can guarantee, it will read 50uh on what ever it was the Heathkit engineers originally used to get their reading of 50uh.
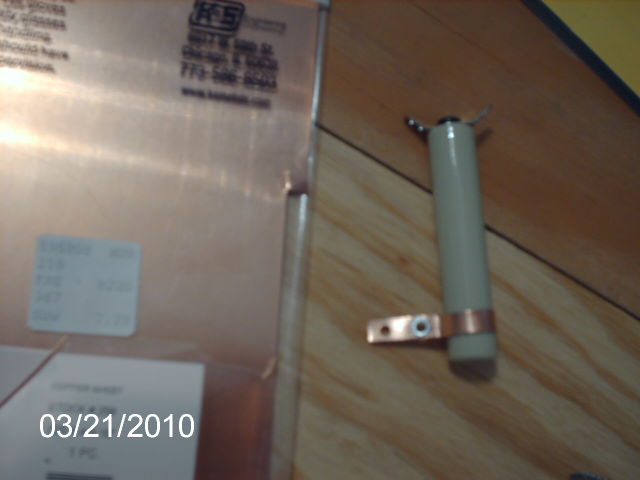 The
Heathkit SB 220 RF Choke is a bit difficult, only because of the tin collar.
Making the collar is by far the most difficult and time consuming part. If
you have one that already has the collar, use that one! Making the collar
can not be over stated "it's very difficult".
What we did in this example was start
The
Heathkit SB 220 RF Choke is a bit difficult, only because of the tin collar.
Making the collar is by far the most difficult and time consuming part. If
you have one that already has the collar, use that one! Making the collar
can not be over stated "it's very difficult".
What we did in this example was start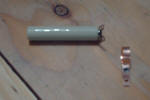 out with a blank ceramic core identical length and width to the original
Heathkit design, we will use copper plate material which we found at the
local hobby store. After cutting, forming, drilling, and installing the
press fit eye-let, and a final metal punch strike to the side (to help with
slippage) this is what we have, an exact size collar made of copper plate on an
exact size new ceramic core.
out with a blank ceramic core identical length and width to the original
Heathkit design, we will use copper plate material which we found at the
local hobby store. After cutting, forming, drilling, and installing the
press fit eye-let, and a final metal punch strike to the side (to help with
slippage) this is what we have, an exact size collar made of copper plate on an
exact size new ceramic core.
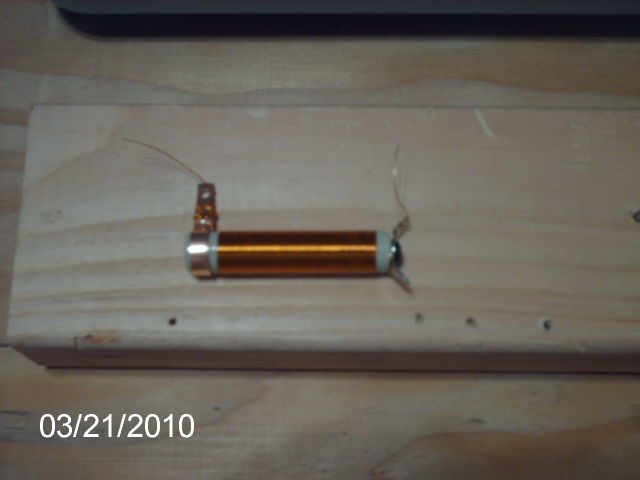 The
wire we will use is the exact type of wire Heath Kit used .014 od, 28 awg Enamel
Coated Magnet Copper Wire. The easiest way to do this is: first
install the 2 solder lugs to the top of the core, and the new collar on the
bottom, hopefully your collar is close to a press fit and does not move very
easily. I like to wrap a little extra wire around the solder lugs to get
started. I usually just stick the wire spool on a nail that is attached to
a piece of 2X4 and then start turning the ceramic core, keeping tension on the
wire, make sure there is a little white showing on the tip of the core.
Turn, turn, and turn, pushing the wire together with your thumb, and keeping it tight,
do not over-lap the wire. Eventually you will reach near the collar....be
sure you do not take the tension off the wire, and then tie it off to the
collar and cut the wire. I have used finger nail polish to hold the wire
to the ceramic core but just a bit of crazy glue works best. You only need to
crazy glue the
ends maybe 1/4 inch and let dry for an hour or so.
The
wire we will use is the exact type of wire Heath Kit used .014 od, 28 awg Enamel
Coated Magnet Copper Wire. The easiest way to do this is: first
install the 2 solder lugs to the top of the core, and the new collar on the
bottom, hopefully your collar is close to a press fit and does not move very
easily. I like to wrap a little extra wire around the solder lugs to get
started. I usually just stick the wire spool on a nail that is attached to
a piece of 2X4 and then start turning the ceramic core, keeping tension on the
wire, make sure there is a little white showing on the tip of the core.
Turn, turn, and turn, pushing the wire together with your thumb, and keeping it tight,
do not over-lap the wire. Eventually you will reach near the collar....be
sure you do not take the tension off the wire, and then tie it off to the
collar and cut the wire. I have used finger nail polish to hold the wire
to the ceramic core but just a bit of crazy glue works best. You only need to
crazy glue the
ends maybe 1/4 inch and let dry for an hour or so.
Be sure you take sand paper and remove the enamel coating on the wire right where it comes off the core and touches the solder lugs and the collar. If you glued the ends and let it dry correctly ( like I had said earlier ) your choke should not unwind itself. Then wind it back on the solder lugs and collar, take out your same, el-cheapo inductance meter and test, removing extra wire will lower your reading. Once you are at your base reading....your finished. My collar's are very tight and it takes some pressure to move it by hand. This collar will be additionally aided in total non-movement once it is completely installed as the Small RF Choke2 and the Door Knob Capacitor will also hold it in place.
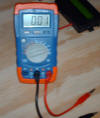
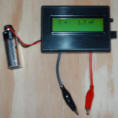 I
purchased and built this inductance meter, it comes in a kit form, from
http://electronics-diy.com and even
though it takes a little while to build, it is about the most accurate Inductance
meter I have used. This Inductance Meter reads very close to what the Heath Kit engineers stated the
readings should be.
I
purchased and built this inductance meter, it comes in a kit form, from
http://electronics-diy.com and even
though it takes a little while to build, it is about the most accurate Inductance
meter I have used. This Inductance Meter reads very close to what the Heath Kit engineers stated the
readings should be.
There seems to be a lot of confusion when it comes to winding this type of inductor. You will see claims of RF Choke builders stating how wonderful their design is over the original... but come on now, these old classic amplifiers have lasted 30 years with out the aid of some new fangled RF Choke Inductor design. "keeping it original, is good enough for me"
Hope this helps you all
written by
Sam G. Moriarity KI6DTC

Free Live Broadcasting from your PC, Laptop
or Cellphone. Voice Chat to the world for Free.
![]() Learn how to build a 80 Meter 1/2 Wave Wire Antenna with out the need of a Tuner.
Learn how to build a 80 Meter 1/2 Wave Wire Antenna with out the need of a Tuner.
![]() learn how to fix your Astron Power Supply meter.
learn how to fix your Astron Power Supply meter.